
To accommodate changes to dental terminology and improve communications between providers and insurance payors, the American Dental Association (ADA) periodically updates the claim format used for claim submissions.
The previous claim form redesign happened in 2019—five years ago! So, we understand if you’ve forgotten how to update your claim format in Dentrix.
Claim Formats Defined
If we peel back the curtain, Dentrix has a setup area called Practice Definitions. You probably rarely go here—because once things are set up, you don’t often need to return to this screen.
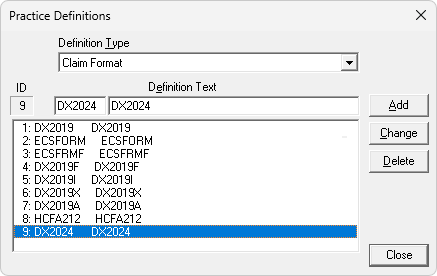
You can access the claim format definitions in the Office Manager by clicking Maintenance > Practice Setup > Definitions. Then, from the Definition Type drop-down list, select Claim Format.
Dentrix allows for up to ten claim formats to be loaded into your system. If you aren’t already using all ten spots, you’ll see that Dentrix automatically added the new DX2024 claim format to an empty row, as seen in line 9 of this example image.
Select the Format for the Carrier
Within each insurance plan’s information, there is an option to choose a claim’s format. The choices in this menu will correspond to what you saw in the definitions earlier.
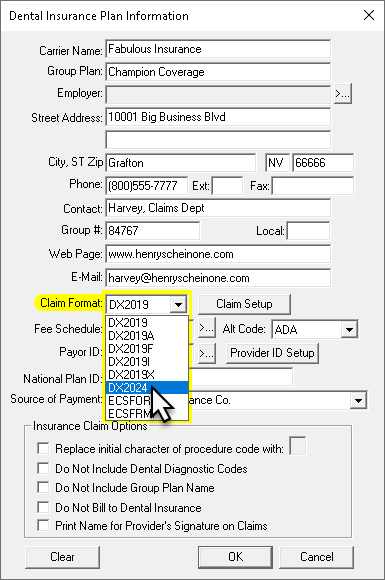
Our experience is that not all carriers are ready to accept the new claims form right away. As you learn that each carrier is accepting it, you can open the insurance information and change the selected form to the new DX2024 option. Eventually, you will get to a point when you will want to switch all insurance plans over to the new claim format.
Don’t worry, we’ve got an easy solution for you! Since each insurance plan has a claim format selected that corresponds to those definitions we looked at earlier, when you edit a definition, you instantly update all insurance plans that are connected to that definition.
How Do I Do That?
To update an existing claim form definition:
- Return to the Practice Definitions screen (in Office Manager click Maintenance > Practice Setup > Definitions) and select Claim Format.
- Select a line showing an old claim form code. This will copy the text of the line into the editable Definition Text boxes at the top of the window. Alter the text by typing the new claim format code of DX2024.
- Click Change. You’ll be warned that the change will affect all insurance carriers that used the old definition. Click OK to proceed with the change.
You can only select and change codes one at a time. And if there are extra characters at the end of the code, go ahead and update the code but keep those characters. For example, DX2012F would become DX2024F, DX2018X would become DX2024X, and so forth.
What About the Duplicate?
After updating line 1 to the new DX2024 claim format, you now have a duplicate showing that definition (in my example, lines 1 and 9). Select the duplicate line and click Delete.
You’ll then be prompted to select a replacement definition. Here, select line 1. Dentrix will double-check all of the plans, and if any have been changed to the “second definition,” they will be switched over to the first. After that, Dentrix will clear that line from the Claim Format definitions!
Additional Information
For more information, read the following topics in Dentrix Help: