The services that dentists provide are continually evolving. According to the American Dental Association, “annual updates enable the CDT Code to effectively accommodate that evolution.” As you provide care for your patients, it’s important to make sure you have available within Dentrix the updated nomenclature so that you can properly document and bill for work completed.
Automatic CDT Updates for Customers using Dentrix G7.3 Update 1 or Later
It’s important to install the yearly CDT Update. That’s why Henry Schein One created the automatic CDT updater (available in Dentrix versions since March 2020). In these versions, the automatic CDT update feature will add new codes for you. You don’t have to run a separate installation or even initiate the process.
If you aren’t using Dentrix G7.3 Update 1 or later, scroll to the bottom of this article for instructions on how to update CDT codes manually.
The automatic CDT update feature runs through the Dentrix Update Manager, which periodically checks for CDT Code updates. When an update becomes available, it will download and install those changes automatically. You’ll receive a notification that CDT updates have been installed, and you’ll have the chance to review them and decide how you want to handle replacement codes or changes to code descriptions.
Pre-Requisites
You will need to be running a version of Dentrix released in March 2020 or later.
CDT Code Update Notifications
When Dentrix detects that the CDT update is available, it will automatically download and install the new codes. The next time you open Dentrix, you will see a message that notifies you that Dentrix has installed the CDT update.
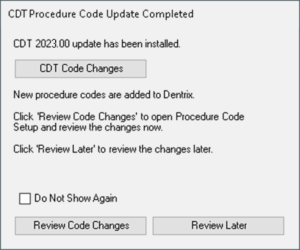
Click CDT Code Changes to review a list of changed codes. Click Review Code Changes to open Procedure Code Setup and review or make changes to your procedure codes based on the new CDT updates. Or choose Review Later to close the message and continue working in Dentrix. If you choose to review the codes later, you will continue to see the CDT update message on the first computer to open Dentrix every day until you review the changes. You can also select Do Not Show Again to discontinue seeing this message.
If you accidentally close the message or choose not to display it again, it’s okay. You can still review the codes and make changes by opening Procedure Code Setup (Office Manager > Maintenance > Practice Setup > Procedure Code Setup). If you’re not sure if the new CDT Codes have been installed or not, this is also how you can check.
IMPORANT: When Dentrix installs the CDT Code update, it adds any new codes in the update to your Dentrix software. However, Dentrix will not make changes to existing codes until you specify how you want to handle those changes. You must review the CDT updates and make changes to existing procedure codes in the Procedure Code dialog box before the CDT update is fully integrated into your database.
Reviewing CDT Updates and Making Changes to Existing Procedure Codes
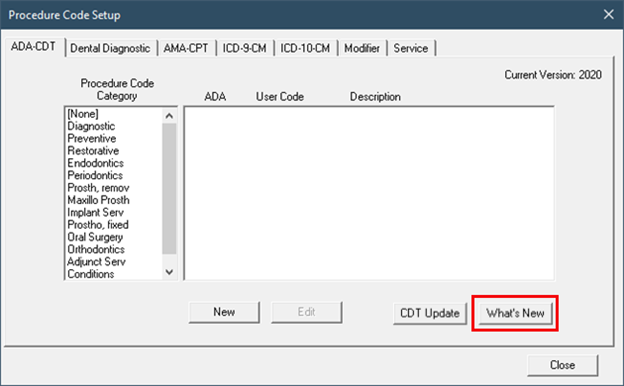
When you click Update Now in the CDT update message, Dentrix will open the Procedure Code Setup dialog box. Click the What’s New button to see the list of what is new and what has changed in the CDT update.
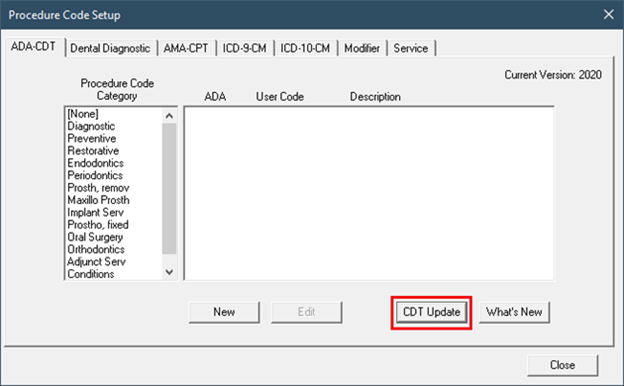
Once you are familiar with the changes in the CDT update, click CDT Update to tell Dentrix how to handle changes to your procedure codes.
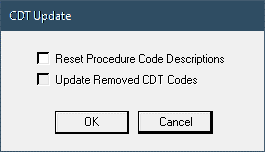
You have the option to Reset Procedure Code Descriptions and/or Update Removed CDT Codes. (Note: one of these options may not be available, depending on the kind of changes that are in that year’s CDT Code update.) Select the check boxes to reset procedure code descriptions or update removed CDT codes as needed, and then click OK.
The option to reset procedure code descriptions will reset all of your procedure code descriptions to the default descriptions prescribed by the ADA. This will overwrite any procedure code descriptions you may have customized, so consider this option carefully before selecting it. If you choose not to reset procedure code descriptions, Dentrix will still add the descriptions for any new codes in the CDT update. It just won’t overwrite the descriptions for existing codes.
The option to update removed code descriptions is available if any codes have been discontinued in the CDT update. Dentrix will look for any retired codes that are part of multi-codes you have set up and give you the option to select a replacement code to use instead.
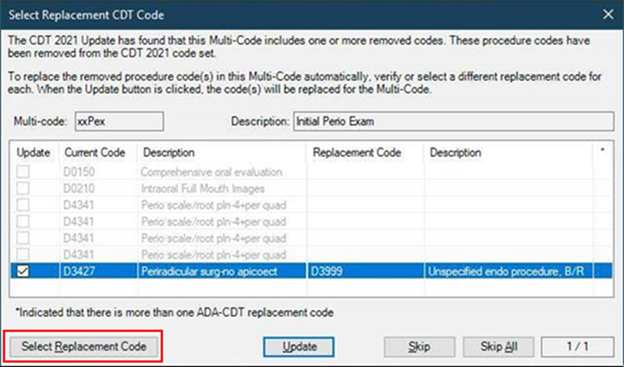
To update removed codes, select the check box next to the code you want to replace, click Select Replacement Code and pick a new procedure code from the list, and then click Update. When you’re done making changes, Dentrix will open the ADA-CDT Log which shows you which codes were replaced and what they were replaced with.
You have enough to worry about at the end of the year! Take the CDT Code update off of your list and let Dentrix do it for you!
Manually Updating CDT Codes
If you are running an older version of Dentrix, we make upgrading as easy as possible! Open the Office Manager and click Help > About Dentrix. Click the Check for Updates button and follow the prompts to update to the newest version of Dentrix. Soon after, you’ll receive the CDT updates automatically. If you’d like some assistance with the upgrade process, contact the support team today to schedule a time to upgrade Dentrix with the help of a support team member.
Adding CDT Codes Manually
If you are not able to use the automatic CDT update process, you can enter new CDT Codes yourself. You will need to obtain the code changes from the American Dental Association, who holds copyright to the material.
For individual steps to add the codes in Dentrix, see this Help File: Adding ADA-CDT Dental Codes.
Editing CDT Codes Manually
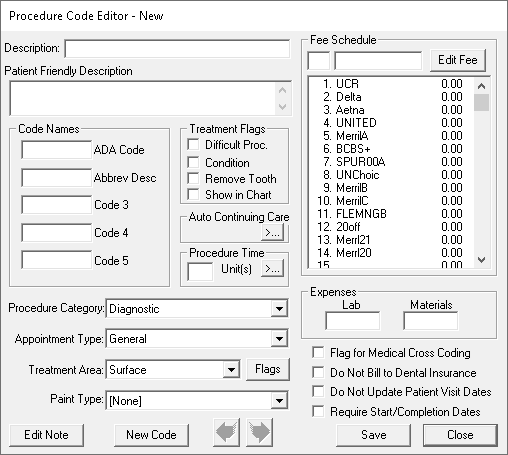
When a CDT code requires editing, you can do that as well. From the Office Manager, open Maintenance > Practice Setup > Procedure Code Setup. Select the procedure code category, select the procedure code, and then click Edit. Make changes as needed. For further information, see this Help File: Editing ADA-CDT Dental Codes.
Note that editing an existing code will also change how it appears in the history of patient ledgers where it has already been applied.
If codes have been discontinued or retired, read these specific tips for editing discontinued procedure codes.
Editing Initial Reasons
Within appointments, you can set up popular procedures as Initial Reasons for convenient scheduling. If codes that were being used as initial reasons have changed, you should update these too.
Open Office Manager > Maintenance > Practice Setup > Definitions. In the Definition Type menu, choose Appointment Reasons.
To edit a procedure, select it form the list. In the boxes at the top of the list, change the procedure code and descriptive test as needed. Then click the Change button.
To add a new procedure, type the procedure code and descriptive text into the boxes at the top of the list. Then click the Add button. There is a limit of 20 reasons.
Editing Multi-Codes
A multi-code allows you to group together procedures that you commonly use into one name to save time when charting, scheduling, and posting these procedures. If any of the individual procedures have been updated through the new CDT changes, you will need to edit the affected multi-codes too.
To edit multi-codes, open Office Manager > Maintenance > Practice Setup > Multi-Code Setup. Select the multi-code and click Edit to open the Multi-Code Editor. Within the editor, select an affected procedure and choose Edit to change the code.
Learn More
For more information about working with procedure codes in Dentrix, read the various topics under Procedure Code Setup in Dentrix Help.
Read Schedule Future Dentrix Updates to Install Automatically.
To learn more about recent Dentrix releases and watch new feature overview videos, visit the Dentrix New Features page.